Getting Started
Leo is written in Python and is run by using a Python interpreter. If Python is not installed on your computer, get its installer from python.org. Python 3.9 or higher is required.
Installing
Install Leo by using Python’s pip installer. In a console or terminal, type the following command:
<python> -m pip install --user leo
Note
Instead of <python>, type the name you normally use for running Python. This might be py, python3, python3.10, or something similar.
Note
The Leo version installed in this way will be called the PyPi version where this makes a difference.
A developmental version of Leo can also be installed. A development version is a work in progress. It will have more features and bug fixes, but may also have new bugs, and new features may be incomplete. Once the PyPi version has been installed, the latest developmental version can be downloaded from Leo’s site on GitHub this way:
In a browser, go to Leo’s GitHub site.
There will be a box at the left with a branch name, probably master. Click on it and select the devel branch.
There will be a box labeled Code. Click it and then click on Download ZIP.
When the download has finished, unzip it to some convenient location
Open a console or terminal in that location.
In the terminal, run this command:
<python> -m pip install --upgrade --user .
On Linux, sometimes other software needs to be installed - see below.
Installing On Linux
Sometimes getting Leo to run on a Linux OS can require additional installation, because different Linux distributions install various pieces of the supporting infrastructure differently. In a few cases they have bugs that must be worked around.
Pip
Some Linux operating systems, including Debian and Ubuntu, require that certain libraries must be installed with the OS’s package manager and not with the usual pip utility. In fact, pip itself is usually not installed, and you need to install it yourself.
Distribution |
Command |
Name in Package Manager |
|---|---|---|
Arch Linux |
|
|
CENT-OS |
|
|
Debian, Ubuntu, Mint |
|
|
Fedora |
|
|
Manjaro |
|
|
OpenSUSE |
|
python310-pip |
Note
The package name may be different on different Linux distributions, and the exact command to run the package manager may be different too. You may need to look through the package manager’s contents, or do an internet search, to find the right package name and command.
Note
If an pre-made installer package cannot be found, see Pip Installation for information and downloads.
After pip has been installed it is advisable to install wheel as well:
python3 -m install --upgrade wheel
Running
Leo can be started in several ways
In a console or terminal, run this command:
<python> -m leo.core.runLeo
In a console or terminal, type leo. This may or may not work depending on how the PATH environmental variable was set up during installation.
By double-clicking on a desktop icon. The way to create one depends on the operating system and will not be covered here. If you do have a Leo icon on the desktop, you can also drag a file over the icon and drop it there.
By double-clicking on a .leo file. This may or may not work depending on the operating system and how the installer configured the installation.
Leo’s own files are called “outlines”. They are XML files whose names end in “.leo”. An outline file contains all the information needed for Leo to reconstruct the outline a .leo file represents. A Leo outline may contain anything from a series of notes to a long Markdown document to a mixture of Python scripts and documentation sections to an entire code base. Leo’s own code base is contained in a single outline named PyLeoRef.leo.
When you run Leo the first time, its window will look much like this:
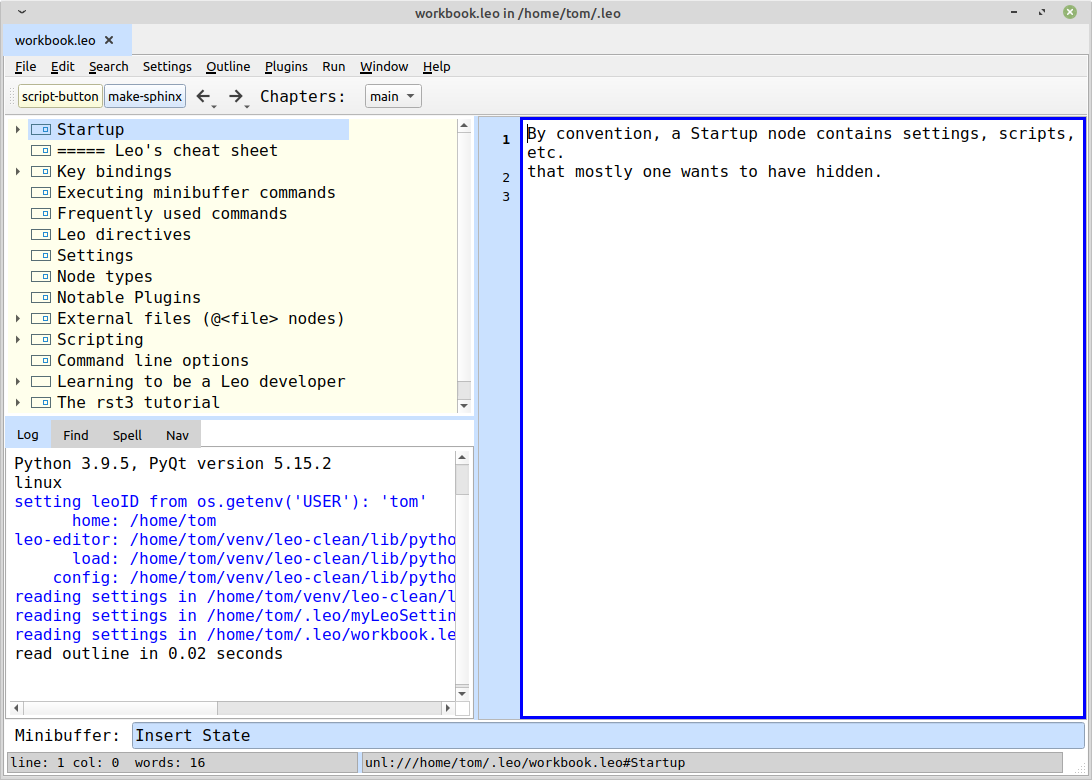
Leo’s typical appearance when run for the first time.
Leo’s Main Parts
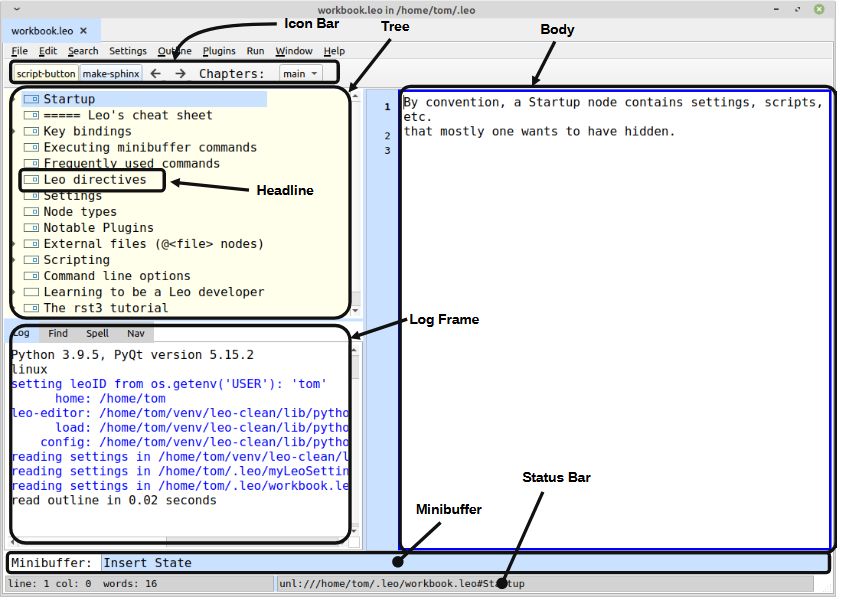
The main parts of Leo’s window are marked.
Almost everything about the panels, layout, colors, and fonts can be customized. Some plugins and commands can add another pane to the overall window.
Let’s take a quick look at these main parts.
The Tree
The tree is the feature that makes Leo an outliner. Each node of the tree (made visible by its headline) contains a piece of the entire Leo outline. That node contains the headline, the text of the body, various data used by Leo, and possibly other optional data. A node is displayed in a position in the tree, and the same node can even appear in several different positions.
When you put the mouse pointer on a node and click, that node becomes selected - it highlights and its body is displayed in the body pane.
You can move (“navigate”) around the tree wth mouse or keystrokes. You can insert a node (<CTRL-I) or delete one (with the <DELETE> key). You can indent or un-indent a node with the <CTRL-R> or <CTRL-L> keys. You can move a node up or down the tree with mouse or keyboard (<CTRL-U> or <CTRL-D>). [*]
More keystrokes and other navigation information is in the Cheat Sheet.
Parts Of The Tree
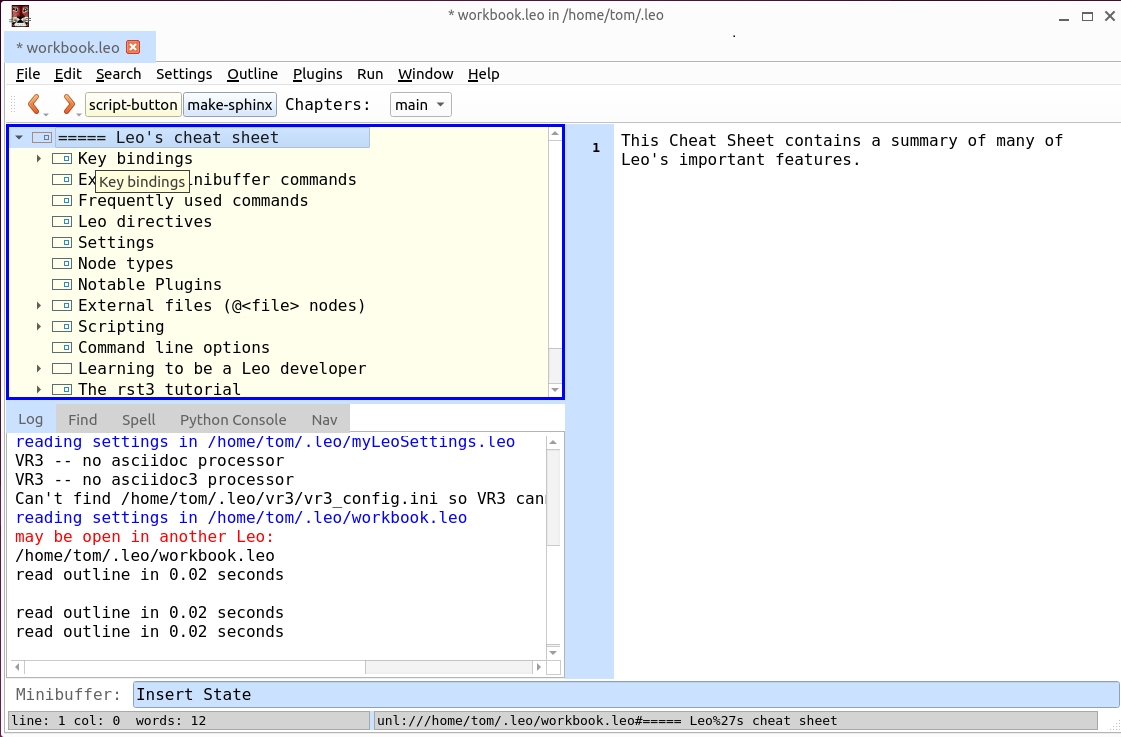
The Workbook’s tree is shown below, with some key features marked:
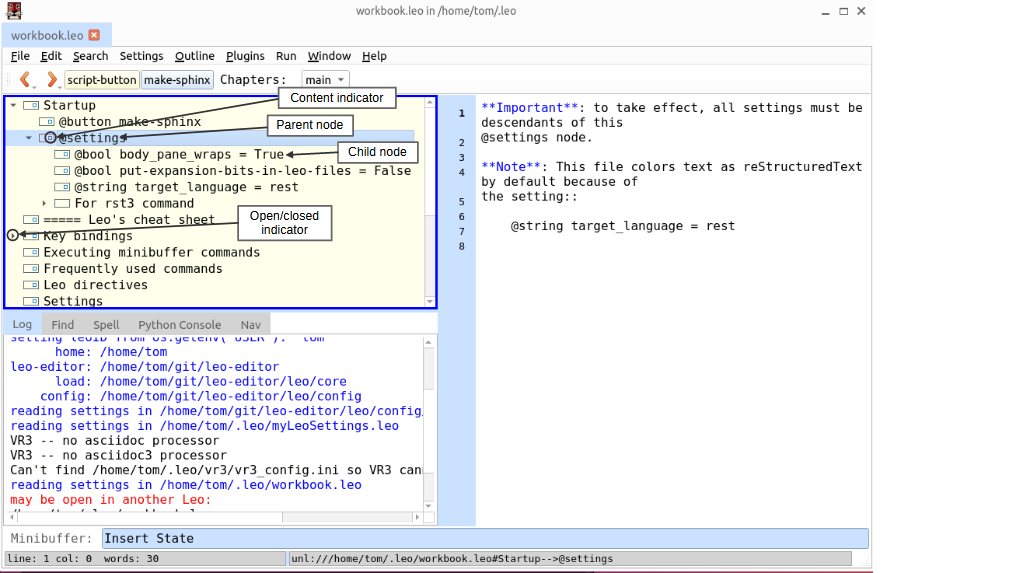
A node may be a child of a parent node. A parent node may have any number of children. Children are shown indented from the parent. Nodes at the same level of indentation are called siblings. A node that is not indented is called a top-level node.
A node with children shows an open/closed indicator icon. Click on the icon and the node will close if open or open if closed.
If a node has content in its body, its icon will change to indicate its presence. [2]
The Body
The body pane displays Leo’s text editor. It shows the text content of the selected node. You can type, select, delete, and otherwise do standard editing tasks in the body. Click in the body to focus it, then start typing or editing. Leo’s editor has some special features that most other editors do not. We won’t cover them in this brief once-over-lightly section, but do experiment.
Leo has an extensive undo/redo ability. You can undo any number of past actions. <CTRL-z> undoes the most recent action. The Edit/Redo menu item, or <CTRL-SHIFT-z> let you redo actions.
Note that the editor only will edit the body of the node you have selected. It is just one part of the Leo outline, often a small part. Leo can put the parts together in many ways, as we’ll see later.
Icon Bar
The Icon Bar contains buttons, the two arrow icons, the and Chapters dropdown list. The two arrows let you navigate between previous nodes in the Tree, one at a time in the order they were visited. The Chapters list lets you choose parts of an outline to look at without needing to see all the other parts: “Chapters” have a parent node whose headline starts with @chapter.
The buttons execute their associated commands. Usually buttons are very personalized. They can be added either in the myLeoSettings.leo outline or an the @settings tree in a particular outline.
The script-button button creates a temporary new button that launches the Python script in the node that was selected when the script-button was pressed. These buttons will be gone the next time the outline is opened. This can be a very convenient feature if you get into a lot of scripting.
Log Frame
The Log Frame contains a number of tabs. More may be added later during a Leo session. also, scripts can add their own tab(s). The Log tab displays messages from Leo’s code, and also from any script that uses Leo’s g.es() method to display a message.
The Find tab contains a dialog pane for performing search and search-and-replace operations. Details are at Searching.
The Spell tab give you access to Leo’s spell checker.
The Nav tab gives you a different way to search an outline. In some ways, it is easier to use and the results can be more readable than the Find tab. It is also covered at Searching.
Minibuffer
The Minibuffer allows you to launch any of Leo’s named commands. You can click in it first, or press the <ALT-x> key to put the cursor in the Minibuffer’s text box. Then you would type the name of the command. Usually you do not need to remember a command’s full name, because the Minibuffer has a “Tab Complete” feature. After you type part of a command’s name, press the <TAB> key, and a new tab will open showing all commands that match what has been typed so far. If one of the commands in the newly-opened Completion tab is the one you want, type more of its name, then <TAB> again. Repeat until the entire command shows in the text box. Then press <ENTER> to execute the command. This process sounds awkward but actually becomes fast and easy with a little practice.
<UP ARROW> move back through the history of previously typed commands.
Some commands also ask you to type some information in the text box, such as the string to replace.
Minibuffer operations are also covered in Leo In Ten Minutes.
Status Bar
The Status Bar can contain messages from Leo or a script, but usually shows line number, column number, and word count of the current body. It also usually shows the UNL address of the current node. A UNL is much like a URL on the World Wide Web, but refers to a node’s location in a particular Leo outline. As a new user, you will probably not need to use a UNL, but it can be copied from the Status Bar to the clipbloard. UNLs are sometimes used by scripts.
The Workbook
A new installation of Leo will start with one outline open. This outline is called the Workbook. The Workbook is very useful as a scratch pad, temporary work area, and experimental area. It can also serve as a reference and note keeper.
Actually, the initial workbook contains a copy of the Cheat Sheet outline. The Cheat Sheet can always be opened from the File/Open Specific Leo File/cheatsheet.leo menu item. So you don’t really need its initial content in the Workbook. You might as well delete it. In the process you will get an opportunity to start playing with Leo’s operations.
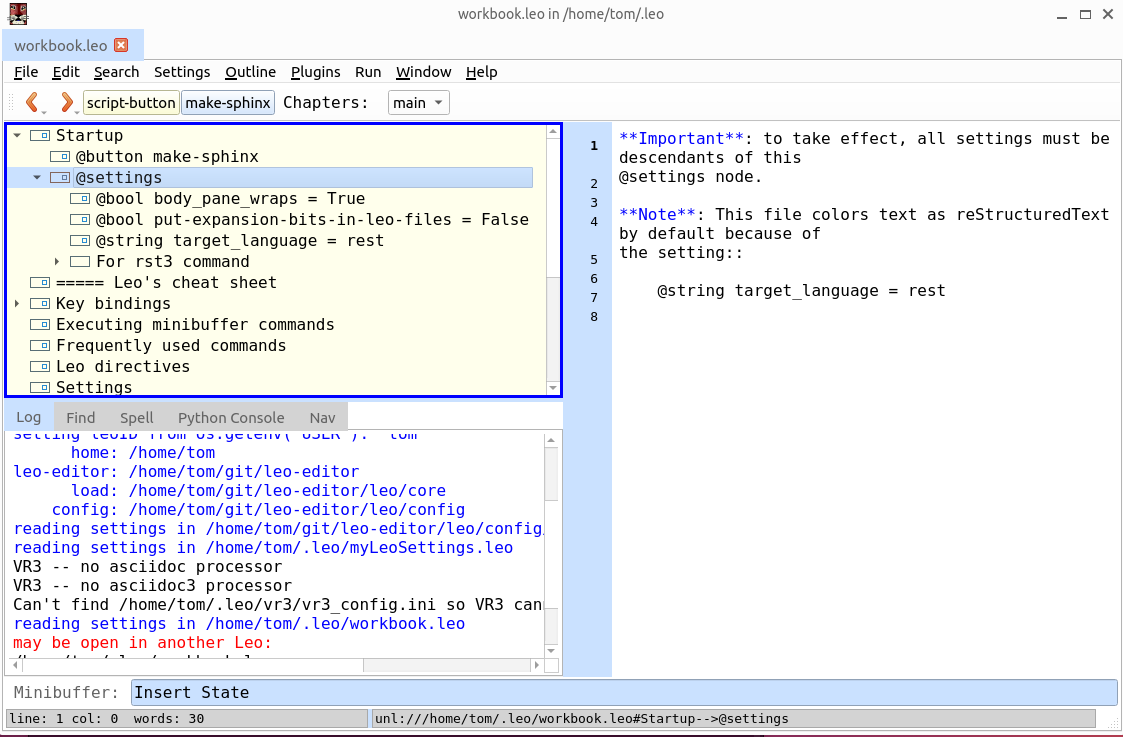
Before we start clearing out the outline, let’s talk about a few of its features. Here’s the starting workbook again, without the annotations:
The @button make-sphinx node causes Leo to create a button with the label make-sphinx in the Icon Bar. Clicking on the button will run the Python script that is in the body of the node (not shown here).
The @settings node contains individual settings, one per node. These settings override the values set elsewhere, but only for this outline. Settings are the way you configure Leo’s appearance and behavior. We’ll get into settings later (see Configuring And Tuning Up Leo).
Later we will be using the workbook for developing script problems.
Deleting Nodes
To delete a node, select it, and press the <DELETE> key. This will also delete the nodes children. Try it out - select the Startup node and press the <DELETE> key. The node and all its children vanish.
Recovering The Nodes - Undoing Actions
Most editing actions in Leo can be undone - reversed - by pressing <CTRL-z>. Try it now and see how the nodes you just deleted return. You can Redo the undone action by pressing <SHIFT-CTRL-z>. Undo/Redo are also available as items on the Edit menu.
If the outline has not been saved after the deletion, you can also restore it as it was at the last save using the File/Revert To Saved menu item.
Deleting All The Nodes
Redo the deletion of the Startup node. At this point all the remaining nodes are top-level nodes. Will we have to delete them one at a time? No, because we can demote them all. To demote a node means to indent it to the right, causing it to become a child of the node above. Promoting is the opposite.
Leo has a command to demote nodes, and a keyboard shortcut for it: <SHIFT-CTRL-}>. This will indent all the siblings below the selected node. In this case, all the nodes are siblings and all will be demoted. Select the topmost node, which is the one with the headline ===== Leo’s cheat sheet. Now demote all its siblings by pressing <SHIFT-CTRL-}>. This result should look like this screenshot:
Now that all the other nodes have been turned into children of the selected node, you can delete that node and all of its children will also be deleted. Your workbook is empty and ready for you to use and experiment with. Save it with <CTRL-s> or the File/Save menu item.
Inserting Nodes
New nodes can be created and inserted into by pressing <CTRL-i>. This can be done whether the tree or the body is focused. The <INSERT> key will also insert a new node, but only when the tree already has the focus.
Creating and Editing Text
Leo is all about creating, editing, and structuring text. Let’s use the Workbook to get some familiarity with these concepts. First, create a new node for the workbook: press <CTRL-i>. A new node will appear in the tree pane and its headline will read newHeadline. The headline will also be highlighted in blue. This means that the headline can be edited, so start typing a name for this node.
For now, just call it Node 1 and press <ENTER>. You can also end editing the headline by clicking in the body pane, or by any other node operation.
To edit a headline that is not in editing mode, you can double click on it.
Now click in the body pane (there is a keyboard shortcut to do this as well). You are in a text editor, and it works much like many other text editors. A double click selects a word, a triple click selects a paragraph. Mouse drag also selects the dragged region.
You can see a few more of the keyboard shortcuts in the Cheat Sheet outline - open it using the File/Open Specific Leo File menu item.
Each keyboard shortcut is connected (“bound”) to a specific Leo command. The command names are given in the shortcut listings; sometimes it’s obvious from the name what something means, sometimes it isn’t.
A (nearly complete) table of Leo’s standard editor shortcuts is given in Editor Shortcuts.
Note
You can list all of the keyboard shortcuts by selecting the Settings/Show Settings/Show Bindings menu item, but this list can seem overwhelming and hard to read. There are about 300 of them; no one remembers all 300. You will learn the ones you use the most.
Any command can also be activated by typing its name into the Minibuffer and pressing <ENTER>. We’ll see later that this is not as inconvenient as it sounds because of the tab completion feature.
Subdividing The Text
Now with Node 1 selected, insert a new node. It will be located just below Node 1. Change the headline to read Node 1a.
Now press <CTRL-r> and the new node will mode the the right - it will be indented under Node 1. This makes it a child node of Node 1, which is its parent.